


Table of Contents
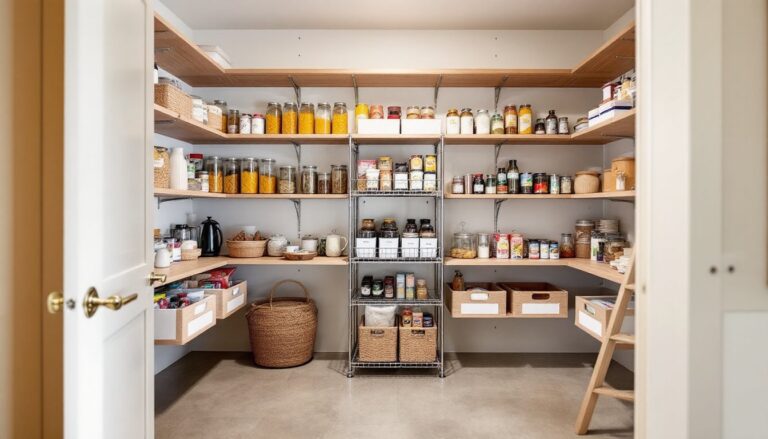
ToggleA well-organized walk-in pantry is the backbone of an efficient kitchen. Walk-in pantry shelving ideas range from simple adjustable systems to custom installations, but they all share one goal: maximize storage while keeping items visible and accessible. Whether you’re working with a compact closet converted into a pantry or a sprawling dedicated room, the right shelving system transforms chaos into order. This guide walks through seven proven shelving approaches, from adjustable metal racking to door-mounted solutions, so homeowners and DIYers can choose what fits their space, budget, and skill level.
Key Takeaways
- Walk-in pantry shelving ideas work best when combining multiple systems, such as adjustable standards for bulk storage, open shelves for frequently used items, and door-mounted organizers for small goods.
- Adjustable shelving systems with metal standards anchored to wall studs provide affordable, flexible storage that adapts as your needs change, with basic setups costing $40–100 in materials.
- Vertical space maximization through tiered shelving and tall industrial racks (36–84 inches) lets you store seasonally accessed items high and everyday staples at eye level for safety and convenience.
- Containment solutions like labeled baskets, drawer inserts, and rotating carousels prevent small items from getting lost and make inventory quick, transforming chaos into organized categories.
- Always anchor shelving to wall studs, use a level for every installation, and follow weight-bearing guidelines—shelves holding canned goods should support at least 50 pounds per foot to ensure durability and safety.
Adjustable Shelving Systems for Flexible Storage
Adjustable shelving is the most popular choice for walk-in pantries because it adapts as your storage needs change. These systems use fixed vertical tracks (called pilasters or standards) mounted to walls or a frame, with brackets and shelves that slide in and out at different heights.
The simplest approach uses metal shelving standards anchored directly into wall studs with heavy-duty lag bolts. Standards are typically spaced 16 or 24 inches apart horizontally, matching stud spacing. Shelves rest on adjustable clips or brackets inserted into the slots. This method is strong, stable, and relatively inexpensive, a basic setup for a single wall runs $40–100 in materials.
For a cleaner, more furniture-like look, consider modular wooden shelving kits. These pre-made units arrive with all hardware and often don’t require anchoring to walls if secured to the floor. They’re easier to install than built-in systems, though they’re pricier (typically $200–500 per unit) and take up more depth.
Before installation, locate studs with a stud finder and mark shelf placement. Pantry shelves typically need 12–18 inches of vertical clearance between levels: adjust based on what you’re storing. A shelf holding canned goods should support 50 pounds per foot of length: bread boxes and snack items need less. If you’re mounting only to drywall (not ideal but sometimes necessary), use heavy-duty toggle bolts rated for at least 25 pounds each, and distribute weight carefully. Always wear safety goggles and work gloves when cutting brackets or fastening hardware.
Open Shelving for Easy Access and Visual Appeal
Open shelving, floating shelves with no visible brackets, or simple boards on standards, keeps items within arm’s reach and makes the pantry feel less cramped. The trade-off is that dust settles more quickly and items must be organized intentionally or the space looks cluttered.
Floating shelves are best reserved for finished, climate-controlled spaces and for displaying frequently used items or decorative containers. They require either mounting directly into studs (using long lag bolts or steel L-brackets) or installing a hidden wall cleat that holds most of the weight. A typical 24-inch floating shelf supports 25–50 pounds depending on bracket quality: don’t overload them. Installation requires a level, drill, and stud finder. If your walls are plaster or older drywall, mounting can be tricky, pilot holes and toggle bolts help, but anchoring into studs is always stronger.
For a hybrid approach, pair open shelves with low-profile wire baskets or bins to contain smaller items. This keeps the visual cleanliness of open shelving while grouping items logically. Many DIYers integrate open shelving on upper walls where lighter items live (spice bottles, containers) and switch to closed cabinets or wire shelving below for bulk goods and heavy canned items. This strategy offers both aesthetics and function. Use a level on every shelf: even a quarter-inch slope makes items slide forward.
Tiered and Vertical Shelving to Maximize Space
Vertical space is goldmines in a pantry. Tiered shelving, narrower shelves stacked higher with deeper shelves below, maximizes every inch without making the room feel cramped.
The classic approach uses adjustable metal shelving units, often 36–48 inches wide and 72–84 inches tall. These industrial-style racks are durable, affordable ($80–250 per unit), and perfect for bulk storage and larger items. They’re available from hardware stores and restaurant supply shops. Installation is straightforward: level the frame, anchor to wall studs if possible (some free-standing units are heavy enough they don’t require anchoring, but verify weight ratings), and load shelves from bottom up for stability.
For a built-in look that matches trim, frame out wall sections using 2×12 or 2×10 lumber for shelves on 2×4 studs spaced 16 inches apart. The nominal sizes (2×12, 2×10) are slightly smaller when milled (actual 1.5 x 11.25, 1.5 x 9.25), so plan accordingly. A beginner-friendly tutorial for 2×4 storage shelving provides step-by-step instructions for this approach. Shelves should be supported every 24–32 inches to prevent sagging: solid wood deflects less than particleboard over long spans. Finish with primer and paint or stain to match your kitchen.
Consider your pantry’s traffic. High shelves work best for items you access seasonally: everyday staples belong at eye level (roughly 54–66 inches from floor) for safety and convenience. Avoid stacking heavy items above head height.
Corner and Wall-Mount Solutions
Corners are often wasted space in pantries. Corner shelving units, L-shaped or triangular shelves designed specifically for corners, can double storage without eating much floor space.
A simple corner solution uses two standard metal shelving units positioned at right angles, effectively creating an L-shaped system. Alternatively, some DIYers install diagonal shelves that run corner-to-corner, creating a tilted storage plane. These require careful measurement and usually benefit from a table saw or miter saw to cut the edges at matching 45-degree angles.
Wall-mounted corner cabinets are pricier but elegant. A carousel or Lazy Susan insert in a corner cabinet lets you rotate items forward without reaching to the back. These typically cost $40–100 and install into existing cabinet bases.
For maximum flexibility, frame a corner with studs and install adjustable standards on both walls. This approach works well if you’re building a pantry from scratch or doing a significant remodel. Mount standards at 16-inch intervals and use sturdy brackets on each side of the corner: weight distributes more evenly. Always install a corner brace or use bolts that run through the wall framing to prevent racking (twisting) under load. Wear work gloves and safety goggles when working with metal studs or fasteners.
Drawer Inserts and Baskets for Small Items
Loose items, snack packs, tea bags, vitamins, disappear into chaos without containment. Baskets and drawer inserts organize small goods and make inventory quick.
Woven baskets (rattan, seagrass, or wire) slide onto shelves and contain everything from pasta to dried herbs. They’re affordable ($10–40 each), stackable, and easy to pull out and replace. Wire baskets let you see contents at a glance, while solid baskets hide clutter but can hide items too.
Acrylic or plastic drawer organizers divide shelves into compartments for spices, seasoning packets, or baking supplies. A typical set costs $15–30 and requires no installation, just place on a shelf.
Rotating shelf carousels (the 2-tier or 3-tier type) spin 360 degrees, eliminating the “lost in the back” problem. Popular for spice storage, they cost $25–60 and fit on any shelf.
For a step up, commit to a labeling system: chalkboard labels, label makers, or waterproof stickers transform bins from “miscellaneous” chaos into organized categories (baking, breakfast, snacks). This small effort pays dividends when household members, and your future self, know where to find things. Label maker tape runs about $15 per roll and lasts for dozens of bins. Simple organization systems from Real Simple offer practical strategies for sorting and labeling pantry items that fit any budget.
Door-Based Storage and Additional Shelving
The inside of a pantry door is premium real estate. Over-the-door organizers, narrow shelves, or hanging systems add 10–20% extra storage without expanding the pantry footprint.
Over-the-door racks hang on the interior side of the door and hold lightweight items: spice jars, foil and plastic wrap rolls, condiment packets, or paper goods. Most cost $20–50, install in minutes (adhesive or screw-mounted), and suit both cabinet doors and solid interior doors. Weight limit is usually 15–25 pounds, so keep items light. Verify your door isn’t hollow-core (a light-duty interior door): if it is, use adhesive-backed organizers rather than screw-mounted ones.
For a permanent installation, mount a 6–12 inch deep shelf along the top edge of the door using lag bolts. This shelf holds spice jars or small boxes. Ensure the door swings freely after installation, a shelf that catches the frame is annoying and dangerous.
If your pantry door opens inward, install a magnetic spice rack or small metal organizer on the inside of the door to hold metal containers or cans. Magnetic systems are invisible once the door closes and don’t impact swing clearance.
Think about your door’s swing. Shelves on a door work best when the door opens fully (180 degrees) without hitting walls or adjacent cabinets. If swing is limited, use lower-profile organizers. Test the door’s swing before fastening anything to avoid a storage system that blocks itself. Woodworking and furniture projects from Fix This Build That include creative door-mounting strategies and space-saving techniques relevant to pantry design.
Conclusion
The best pantry shelving system balances accessibility, durability, and your budget. Start with a clear inventory of what you’re storing, canned goods, bulk dry items, small containers, or a mix, then choose a system that handles those loads safely. Adjustable shelving adapts as life changes. Open shelving looks clean but demands organization discipline. Vertical and corner solutions squeeze every inch from tight spaces. And door and drawer inserts prevent small items from vanishing. Most homeowners combine multiple approaches: adjustable standards for bulk storage, baskets and bins for organization, and a door rack for quick-grab items. Install carefully, use a level, and don’t skip anchoring to studs on weight-bearing walls. A well-planned pantry saves time, reduces food waste, and makes cooking more enjoyable.