
Table of Contents
ToggleA patio ceiling isn’t just overhead, it’s the fifth wall of your outdoor room. Whether you’re shielding from the sun, creating ambiance, or framing architectural interest, the right patio ceiling can transform a bare backyard into a true extension of your home. From rustic timber beams to sleek modern structures, the options available today give DIY homeowners practical ways to add shelter, style, and function without very costly. This guide walks through seven proven ceiling ideas, each with specific takeaways on materials, installation complexity, and what they’ll actually cost you.
Key Takeaways
- Patio ceiling ideas range from open beam timber structures ($8–$40 per linear foot) to retractable shade systems ($800–$8,000), each offering different trade-offs between cost, weather protection, and visual appeal.
- Proper fastening is critical: always use galvanized or stainless steel bolts and structural screws for any patio ceiling, never rely on nails alone, and verify your posts can handle the load before installation.
- Tongue-and-groove wood ceilings create a polished finish at $3–$12 per linear foot but require solid backing, 16-inch joist spacing, and resealing every 2–3 years for durability.
- Modern metal and aluminum ceilings span 16–20 feet with fewer posts and offer sleek aesthetics, but professional installation is usually required due to structural and welding demands.
- Integrate lighting into your patio ceiling design with recessed LEDs, string lights, or smart controls, ensuring outdoor-rated fixtures and GFCI protection for safety and compliance with local electrical codes.
- Check local building permits and codes before building, especially for structural work attached to your house, and prioritize material quality suited to your climate to ensure decades of reliable use.
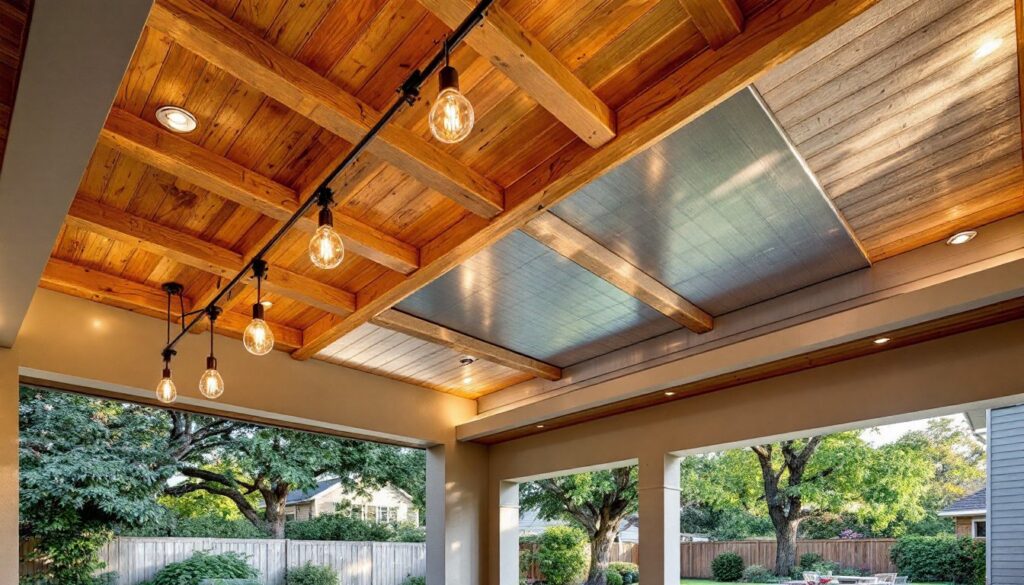
Open Beam And Timber Ceilings
Open beam ceilings bring warmth and visual drama to a patio. Real timber or faux beams create a lodge-like feel while keeping sightlines high and the space feeling less enclosed than a solid soffit.
For authentic timber, standard options include reclaimed barn beams (actual salvaged wood) or solid pressure-treated beams rated for outdoor use. Reclaimed beams cost more ($15–$40 per linear foot) but tell a story: pressure-treated options run $8–$15 per foot and are easier to source. Faux beams, made from polyurethane or composite, cost $3–$10 per foot and weigh far less, making them ideal if you can’t anchor heavy loads to your existing posts.
Before ordering, measure your patio’s span (the distance the beams must cover) and check whether your posts or structure can handle the load. Beams typically sit on top of posts or are bolted directly to them. If attaching to an existing structure, use galvanized lag bolts or structural fasteners, never rely on nails alone. A 2×10 pressure-treated beam spans roughly 15 feet unsupported: longer spans need additional posts or engineering. Spacing beams 24–48 inches apart (on-center) creates visual rhythm without looking sparse.
Difficulty: Moderate to High. Aligning and fastening heavy timbers requires accurate layout and at least two pairs of hands. If your patio is attached to the house, check local building codes, most jurisdictions require permits for structural work.
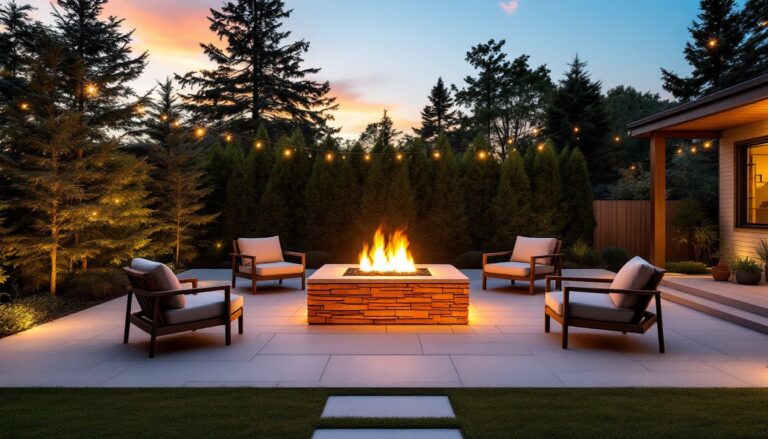
Retractable Shade Systems
Retractable shade systems, motorized or manual awnings and screens, give you on-demand sun control without the permanence of a solid ceiling. A motorized retractable awning costs $2,500–$8,000 installed, but you get seasonal flexibility and the option to retract in heavy winds or winter.
Manual crank or pull-down systems run $800–$3,000 and work well for smaller patios (8–12 feet wide). Shade fabrics vary: basic acrylic runs $25–$40 per yard: solution-dyed fabrics (better UV resistance and color retention) cost $40–$70 per yard. The fabric backing matters too, vinyl-backed fabrics block light more effectively but trap heat underneath: open-weave varieties let air circulate.
Installation depends on whether you’re mounting to an existing frame, the house, or a freestanding structure. Motorized systems need an outlet nearby or a hardwired connection (which may require an electrician). Always secure the mounting bracket bolts with structural screws or bolts rated for outdoor use, not standard drywall anchors. Test the mechanism before fully tensioning the shade, and use a load cell or specialist if you’re unsure the frame can handle wind loads.
Difficulty: Moderate. Manual systems are DIY-friendly: motorized versions demand careful wiring and secure anchoring. Seasonal winds can stress cheap mounts, so invest in rated hardware.
Pergola And Lattice Designs
Pergolas are the middle ground: they provide partial shade (not full weather protection) while maintaining airiness and visual interest. A basic slatted-top pergola, where 2×6 or 2×8 boards run parallel with spacing for filtered light, costs $800–$3,000 in materials for a 12×12-foot kit or custom build.
Lattice panels mounted under pergola beams or attached to posts add dappled shade and a place for climbing vines (clematis, climbing roses, or fast-growing annual varieties like morning glories). Open lattice is cheap ($30–$100 per panel, 4×8 feet) but shades less: solid lattice or vinyl-coated options run $100–$250 per panel and last longer in wet climates.
Key measurements: beams should sit on posts spaced 8–12 feet apart to avoid excessive sag. Use 6×6 posts or doubled 2x6s bolted together for a 12-foot span. Fasten everything with galvanized bolts, lags, or structural screws, never rely on exterior-grade nails for main connections. If attaching to the house, flash the ledger board where it meets the rim joist: missed flashing causes rot and expensive repairs.
Vine growth adds weight over time. Plan for increased load once mature greenery fills your lattice, and ensure posts can handle the added moisture and lateral stress. Prune vines annually to prevent overload and keep debris from clogging gutters.
Difficulty: Moderate. Layout and post-setting are straightforward: the challenge is secure fastening and, later, ongoing vine management.
Tongue-And-Groove Wood Finishes
Tongue-and-groove (T&G) ceilings create a finished, polished look. 1×6 or 1×8 T&G boards (nominal: actual width is roughly 5.5 or 7.5 inches) run in continuous rows and can be stained, painted, or left to weather naturally. Material costs range from $3–$12 per linear foot, depending on species (pine, cedar, composite) and grade.
Cedar is the traditional choice, it weathers gracefully to silver if left bare, or takes stain beautifully. Pine is cheaper and works if painted or sealed regularly. Composite T&G (wood-plastic blend) costs more upfront ($8–$12 per foot) but resists rot and insects without annual maintenance. Always buy exterior-grade T&G: interior products delaminate and fail quickly outdoors.
Prep is crucial: all T&G must be installed over solid backing, framing joists, a pergola frame, or a soffit board. Never run T&G directly on beams with gaps underneath: it will cup, split, and rot. Space joists 16 inches on-center at most for 1×6 material to prevent sag. Nail or screw boards perpendicular to joists using stainless steel or galvanized fasteners, driving two fasteners per joist per board to prevent warping. Leave 1/8-inch gaps for seasonal wood movement, especially in humid regions.
Finishing adds time: primer plus two coats of exterior paint runs 2–3 gallons for a 12×12-foot ceiling. Plan for touch-ups every 2–3 years if painted. Natural finishes (clear sealer or UV-blocking stain) last longer on cedar but still need refreshing every 3–5 years.
Difficulty: Moderate. The repetitive work is manageable, but proper framing and fastening are non-negotiable.
Metal And Modern Structural Ceilings
Galvanized or powder-coated steel and aluminum offer sleek, minimal aesthetics and extreme durability. A modern slatted aluminum ceiling, thin parallel bars or tube stock, can span 16–20 feet with fewer posts than timber and weighs half as much. Cost ranges from $2,000–$6,000 in material for a mid-sized patio, plus professional installation.
Corrugated metal panels (steel or aluminum) bolt to a frame and shed water, making them good for creating an enclosed pergola or semi-protected workspace. Standing-seam panels cost $8–$15 per square foot installed. Expanded metal mesh (steel or aluminum) allows airflow while reducing glare and UV: it’s often powder-coated in matte black, bronze, or white.
Metal requires careful fastening: stainless steel or hot-dip galvanized bolts prevent corrosion in the fastener. Don’t mix dissimilar metals (aluminum to steel): galvanic corrosion will pit and weaken the joint. Aluminum alone is lighter but less rigid: 3/8-inch aluminum tube stock is a practical minimum for spans over 12 feet.
Installation usually demands professional help unless you’re comfortable welding or working with structural steel. If DIY-mounting panels, use a structural engineer’s approval for load calculations, and hire a licensed electrician if running wiring through the frame for lights.
Difficulty: High. Design and structural work often require professional input. DIYers can assemble pre-fab kits, but custom or load-bearing work isn’t a weekend project.
Lighting Integration And Ambiance
A patio ceiling is the perfect stage for lighting. Recessed fixtures, string lights, or track systems transform the space after sunset and make the overhead structure a design focal point.
Recessed LED downlights cost $30–$80 per fixture and space them 6–8 feet apart for even coverage. Install them into soffit or T&G ceilings before finishing: retrofit kits exist but look clunky. Use outdoor-rated fixtures (IP65 or better) in damp climates: they resist moisture and corrosion better than interior-rated lights.
String lights and café-style bulbs are quick, affordable alternatives. Edison bulbs and filament LEDs ($5–$15 per bulb) slung overhead create warmth without hard installation. Drape them on retractable cables, or zip-tie them to beams or lattice. For permanent wiring, hire a licensed electrician, outdoor circuits need GFCI protection (ground-fault circuit interrupter) per the National Electrical Code (NEC), and most jurisdictions require permits for new outdoor circuits.
Dimmers and smart controls ($100–$300 total) let you adjust ambiance seasonally. RGB color-change bulbs add playfulness but consume more energy than warm-white LEDs.
Safety first: bury any permanent wiring 12 inches deep in conduit, use weatherproof outlet boxes, and label circuits clearly. UV-rated wire and outdoor-rated components cost a little more but don’t degrade in sun and heat.
Difficulty: Low to Moderate for hanging string lights. Permanent electrical work requires professional expertise. Don’t guess on NEC compliance, get a licensed electrician.
Conclusion
Choosing a patio ceiling depends on your climate, budget, and how you use the space. Timber feels timeless and works in most settings: retractable systems give flexibility: pergolas offer charm with partial coverage: T&G delivers polish: metal provides modern edge: and lighting ties it all together. Resources like Bob Vila’s porch roof ideas and design platforms such as HGTV and The Spruce offer visual inspiration alongside technical depth. Whatever direction you choose, prioritize secure fastening, material quality suited to your climate, and any required permits. A well-built patio ceiling becomes an investment your family enjoys for decades.